Friday, 6 March 2009

Shots: Kodak Vest Pocket Camera

I got hold a vest pocket camera some time ago, but never got around to testing it (mostly due to the fact that only one company still makes the film). A couple of days ago I tested it in my new favorite method; using photo paper.


I cut some sheets to the size of the camera and popped them in the camera. The first image I took was with the widest aperture in bright sun with a 1 sec shutter. Completely over exposed.

I tried it again with the smallest aperture and got a beautiful result.

Labels: , , , , , , , , , ,

Wednesday, 11 February 2009

Lazzzor Cut Pinhole Test Image

I'm gonna make this post a short one as I've got loads of work I need to hand in tomorrow morning and I haven't done it yet!!!

Anyways, I made a design of a pinhole camera that could be laser cut for a college project and, after a few modifications, I cut it out. Several weeks later I actually got around to testing it, and here is the result.


I will upload the plans so that you can give it a go if you know where a laser cutter is and you have basic burglar skills. Oh, the camera looks like this...

Labels: , , , , , , , ,

Sunday, 25 January 2009

Shots: Yashica J


This is the Yashica J, released in 1961, is a rather nice little rangefinder from Japan. It's not a high-end model, but more of a basic without the light metre of other Yashicas at the time.

Format: 35mm film
Lens: Fixed, 45mm, f2.8
Shutter: Blade, B - 1/300
X-sync Shoe

I shot my first roll on this a couple of days ago, and I must say I love the look it gives the photos. It's a slightly low contrast with nice shallow depth of field. All the photos I took were in focus and well exposed (which kind of surprised me) and I got some good shots from it!


Labels: , , , , , , , , ,

Tuesday, 20 January 2009

Proper Pinholing

A couple of days ago at college, us photo/filmy people were introduced to pinhole photography. There were three cameras; a coffee can with a hand done hole, an ammo box with a pinhole and the ammo box we used with the "LAZZZOR PUNCHED" hole. Sure the coffee can gave interesting distortions, but the quality of the image the laser hole gave was amazing!!!

Being a pinhole, we were trying to play with scale. The above image of Bournemouth Uni was a bit of an accident. We wanted to be looking up at it, but it was very, very, very wide angle, so we got the fence (1' high) in shot and it looks quite interesting. That's a five minute exposure, and as an image: I love it!

This was an earlier attempt. At bit contrasty.

Labels: , , , , , , ,

DIY Large(ish) Format - On the Cheap

I had an old slide projector lens hanging around that inspired me to build a large format camera. Well, being a 35mm projector, it wasn't that large, but I did get a decent size print. (VW shown for scale, the top is actually about 6''x6'')


The lens had a big thread on is which made focusing easy as cake. The box is made from an old shelf and panted black inside. It's not terribly convenient; you have to go out, focus it, fix and seal the focus, put the paper in, go back, do a really quick exposure, then go back and develop it. (The tape on to of the camera is the lens cap/shutter). Anyways... here are a coupe of sample shots.

This was my attempt. As you can see, the paper was not as sensitive as I thought it was.

Same shot but this time with a 10 second exposure. I really like the reflections on the floor. Th

is was a very quick flash of an exposure outside. It's a path going past the hall' on campus, it doesn't look as good in real life.

I hope do more things like this as I have learned to use the automatic developing machine thing so I don't have to do all the developing late at night in the bathroom!

Labels: , , , , , ,

Monday, 3 November 2008

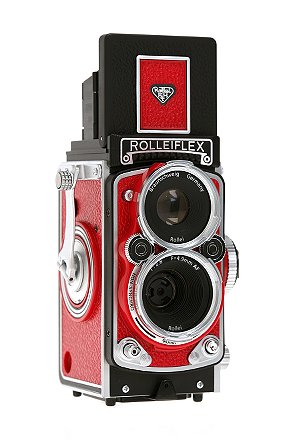
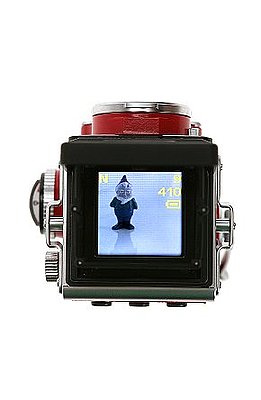
Baby Rollei

Another post about owning a Rollei, but this time it's not as cheap. What you're looking at isn't a '20s antique, but the Rolleiflex Mini Digital camera. 5MP, auto focus and the ultra-cool head-down LCD. It goes the whole hog as well, with the film advance crank and a cool leather strap. It might not be the many thousands the its medium format cousins, but it will set you back about £200 ($400), which can only really be justified by the novelty value. I certainly won't be buying one in the near future, but if you can't resist one, let me know how is feels and the quality of its shots.
[geeksugar]
[UrbanOutfitters]

Labels: , , , , ,

Saturday, 18 October 2008

Want a Rolleiflex but Have More Sense than Money?


Most of today I spent making a vector Rolleiflex, simply because I wanted one! It was rather hard to find to get images of three sides of the same model, so this isn't accurate at all. Anyway, you can download the PDF and make one yourself!

Download Here (3MB)

Labels: , , , , , ,

Use Your Holga with 135

We all know that normal Holgas take 120 film, which you either have to develop yourself (and mess it up if your me) or send it off to an expensive lab. But it is actually very easy to temporarily convert it to take 135 film without buying the back! So let's get started.

You will need:
  • Your Holga120 (mines the GCFN)
  • A used 120 spool (I don't know why I put two in the photo)
  • Electrical tape (gaffer tape will also work, but it leaves sticky gunk)
  • Bits of foam
  • Rubber bands (the thick ones work well)
  • A roll of film (I know this one is already developed, it was completely over-exposed so I put it in a canister for tests like this)

Step One: Open the back of your holga. You will need either the 6x6 or 6x4.5 mask if you want to get the images printed normally.


Step Two: Get the spool and wrap the rubber bands around either end to leave a gap that is big enough the let the film through.


Step Three: Attach the film leader to the spool with tape.


Step Four: To make the 135 mask, get some black card stock (this is 160g) and cut out a square that's about 63mm square, then in the middle cut out a gap that is exactly 36mm wide and either 24mm or 36mm high (depending whether you want the sprockettes exposed).


Step Five: Place the spool in the right hand side, like loading the 120 film.


Step Six: Place the canister in the left had side and support the top and bottom with the foam. Layers of thick card might work, too.


Step Seven: Because 135 has no backing, you will need to block off the window with the electrical tape. I have only done one layer hear, but feel free to do more.


Also block it off on the inside for maximum light-proofing.


Step Eight: Close it all up and wind the film on a turn and a half and your all set. For even more security, you may wish to seal all round the edges with tape.


When you have taken a shot, wind the film on 21 clicks, if you want to try with wider shots, calculate yourself how many clicks you'll need. It helps to use a piece of paper or something.

What do the results look like? Take a look for your self.


Labels: , , , , , , , , ,

Friday, 6 June 2008

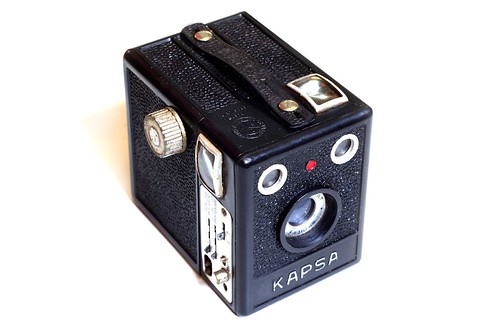
Kapsa: Brazil's Secret Camera

A couple of weeks ago I was given an old, 120 camera spay painted entirely gold; don't ask why. But anyway, I cleaned it all up with white spirit and washing up liquid and did a pretty good job of getting all the paint off. It looked like one of the later Kodak Brownies, but had a little logo of some kind and the words "INDUSTRIA BRASILEIRA": Made in Brazil on the top. It was getting more intriguing. On the front, under the lens, it had big sliver letters spelling out "KAPSA" (Brazilians seem to like their capital letters). So I did a little Google search and came up with very little; things like the "Korean American Pharmacy Student Association" and an Arabian dish made from chicken and rice. With the general search being a bitter disappointment, I moved on to other things. I had a gander at Flickr and found a handful of people who still use them.

I thought to myself "that can't be all there is on the internet!" and had another look at the camera. Then I noticed that on the metal bit around the lens was the peculiar word "VASCROMAT", again in block caps. Crossing my fingers, hopping I found something relevant. It was a hollow victory when the 75 results came back 0.49 seconds later; they were all in Portuguese! And most were just telling you how much they were worth. I did manage to find the most important information. The shutter speed. It is apparently 1/100. Which means that I have to use 160 ISO film. Which unfortunately does not want to be found easily. So rather than wasting my life hunting film in the vast planes of eCommerce websites, I decided to use 400 ISO that was stopped down to 200 with an ND 2 filter.

The camera has a little window on the inside as a mask for the incoming light. It it no bigger than an inch square, so I could just get some ND lighting gel. You can buy a whole sheet for the same price as a regular glass filter, but I only want a tiny square. That is where a little help from my friends come is. I know a woman who is a TV production designer and she said that she could have a word with a lighting technician who would have some ND gels. So until then I'm stuck with 400 ISO colour negative film. I did read about red scaling colour film some time ago and remembers something about you having to adjust it exposure by a couple of stops. I looked it up again and indeed, the celluloid is ND 2-3 so I just did that with some 35mm with the canister blue-taced in upside down where the new spool would normally go and taped the leader to the take up spool and I'm looking forward to seeing the results.

Image by Rodrigo Moraes

Labels: , , , , ,